Ubuntu Environment
Ubuntu EnvironmentNew Ubuntu 18.04 install on x86_64 workstationInstall Ubuntu 18.04 Alongside With Windows 10 in Dual BootNew Ubuntu 18.04 install on x86_64 MSI GS65 laptopInstall Ubuntu 18.04 Alongside With Windows 10 in Dual BootInstalling system libraries and toolsUpdate UbuntuInstall the NVIDIA 440 driverCheck CPU temp with Psensor GUI toolDevelopment ToolsNvidia LibrariesCUDACuDNNVideo CodecOptiX - Ray Tracing EngineInstall Third Party LibrariesQt 5.15.0Install DatasetsInstall Neural Network modelsCLion buildCheckout the sourceCreate the CLion project
New Ubuntu 18.04 install on x86_64 workstation
Install Ubuntu 18.04 Alongside With Windows 10 in Dual Boot
- Download Ubuntu 18.04 ISO from https://www.ubuntu.com/#download
- Follow the procedure on https://www.itzgeek.com/how-tos/linux/ubuntu-how-tos/how-to-install-ubuntu-18-04-alongside-with-windows-10-or-8-in-dual-boot.html
New Ubuntu 18.04 install on x86_64 MSI GS65 laptop
Install Ubuntu 18.04 Alongside With Windows 10 in Dual Boot
- Use ubuntu 18.04 boot USB created from workstation install
- Follow the procedure on https://askubuntu.com/questions/1063910/installing-ubuntu-on-a-msi-gs65-freezes-at-login-screen
Installing system libraries and tools
Update Ubuntu
$ sudo apt-get update$ sudo apt-get full-upgrade$ sudo ubuntu-drivers autoinstall# Disable auto resize of windows at top$ gsettings set org.gnome.mutter edge-tiling false
Install the NVIDIA 440 driver
Get the latest supported drivers from the Ubuntu repository
$ sudo add-apt-repository ppa:graphics-drivers/ppa$ sudo apt update
Open Softare & Updates program from the application menu. Click the Additional Drivers tab. You can see what driver is being used for NVIDIA and a list of proprietary drivers.
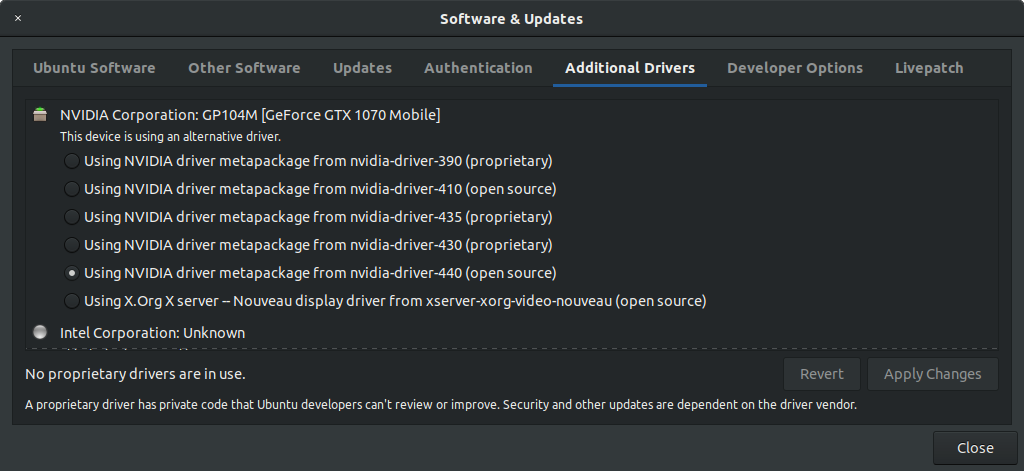
As you can see nvidia-driver-440 is available for the GeForce GTX 1080 Ti card. Select nvidia-driver-440 and click Apply Changes button to install the driver. Reboot the system to apply the changes.
After reboot, use the follow command to check the driver version
$ nvidia-smi
Check CPU temp with Psensor GUI tool
Install the needed tools
$ sudo apt install lm-sensors hddtemp
Start the detection of your hardware sensors:
$ sudo sensors-detect
Check the operations
$ sensors
Install Psensor
$ sudo apt install psensor
Development Tools
CLion IDE - ubuntu software app
Google Chrome Web Browser
Go to https://www.google.com/chrome. Click the
Download Chromebutton. Select the first option (64 bit .deb for Debian/Ubuntu), clickAccept and Installto download the installergoogle-chrome-stable_current_amd64.deb. Double click on the install file to install.CMake - ubuntu software app
KDiff3 (File And Directory Comparison And Merge Tool) - ubuntu software app
Doxygen
$ sudo apt-get install doxygen$ sudo apt-get install doxygen-gui$ sudo $HOME/Projects/pdp/scripts/add-doxygenMenuItem.shTypora
$ sudo apt-key adv --keyserver keyserver.ubuntu.com --recv-keys BA300B7755AFCFAE$ sudo add-apt-repository 'deb https://typora.io/linux ./'$ sudo apt-get update$ sudo apt-get install typoraSubversion - command line (svn)
$ sudo apt-get install subversionSmartSVN
- Download the latest version
smartsvn-linux-11_0_0.tar.gzfrom https://www.smartsvn.com/downloads/smartsvn/smartsvn-linux-11_0_0.tar.gz - unpack to
$HOME/Developer/smartsvn
$ cd $HOME/Developer/smartsvn/bin$ sudo ./add-menuitem.sh- Download the latest version
7Zip
$ sudo apt install p7zip-full p7zip-rarBuild essential tools
$ sudo apt-get install build-essential g++
libjpeg
$ sudo apt-get install libjpeg-devlibturbojpeg
$ sudo apt-get install libturbojpeg-devlibz
$ sudo apt-get install libz-devliblzma
$ sudo apt-get install liblzma-devEGL
$ sudo apt-get install libegl1-mesa$ sudo apt-get install libegl1-mesa-devGLES
$ sudo apt-get install libgles2-mesa$ sudo apt-get install libgles2-mesa-dev$ sudo apt-get install freeglut3-devX11 development
sudo apt-get install xorg-devCleanup
$ sudo apt-get update$ sudo apt autoremove
Nvidia Libraries
CUDA
Download the
CUDA 10.2Ubuntuinstaller$ cd ~/Developer/Projects$ mkdir installers$ cd installers$ wget http://developer.download.nvidia.com/compute/cuda/10.2/Prod/local_installers/cuda_10.2.89_440.33.01_linux.runInstall
CUDA 10.2using the installerx$ sudo sh cuda_10.2.89_440.33.01_linux.runChoose "Continue" when prompted about the existing package managerType "accept" when prompted for acceptance of the EULATurn off the Driver install on the following options screen (440 driver installed above)CUDA Installer- [ ] Driver[ ] 440.33.01+ [X] CUDA Toolkit 10.2[X] CUDA Samples 10.2[X] CUDA Demo 10.2[X] CUDA Documentation 10.2Then choose "Install"Add
CUDA 10to the development search path by adding the following lines to.bashrc$ nano .bashrc# NVIDIA CUDA Toolkitif [ -d "/usr/local/cuda-10.2/bin/" ]; thenexport PATH=/usr/local/cuda-10.2/bin${PATH:+:${PATH}}export LD_LIBRARY_PATH=/usr/local/cuda-10.2/lib64${LD_LIBRARY_PATH:+:${LD_LIBRARY_PATH}}fi$ source ~/.bashrcCheck
NVIDIA CUDACompiler$ nvcc --version
CuDNN
Download the
cuDNNpre-built libraries for Linux,CUDA version 10.2cudnn-10.2-linux-x64-v7.6.5.32.tgzfrom https://developer.nvidia.com/rdp/cudnn-download using the cuDNN Library for Linux link. Movecudnn-10.2-linux-x64-v7.6.5.32.tgzto$HOME/Developer/Projects/installersAdd the header files and pre-built libraries to the
CUDAinstall$ cd $HOME/Developer/Projects/installers$ tar -xvf cudnn-10.2-linux-x64-v7.6.5.32.tgz$ cd cuda$ sudo cp -P include/* /usr/local/cuda/include/$ sudo cp -P lib64/* /usr/local/cuda/lib64/$ cd ..$ sudo rm -rf cuda
Video Codec
Download the
Video Codec SDK 9.1pre-built libraries for Linux,Video_Codec_SDK_9.1.23.zipfrom https://developer.nvidia.com/nvidia-video-codec-sdk/download to$HOME/Developer/Projects/installersand unzip toVideo_Codec_SDK_9.1.23Add the header files and pre-built libraries to the
CUDAinstall$ cd $HOME/Developer/Projects/installers$ sudo cp include/* /usr/local/cuda/include/$ sudo cp Lib/linux/stubs/x86_64/* /usr/local/cuda/lib64/
OptiX - Ray Tracing Engine
Download the
OptiX SDK 7.0pre-built libraries for Linux,NVIDIA-OptiX-SDK-7.0.0-linux64.shfrom https://developer.nvidia.com/designworks/optix/download to$HOME/Developer/ProjectsInstall
OptiX SDK 7.0using the installer$ cd $HOME/Developer/Projects$ sh NVIDIA-OptiX-SDK-7.0.0-linux64.sh$ mv NVIDIA-OptiX-SDK-7.0.0-linux64.sh installers/.$ mv NVIDIA-OptiX-SDK-7.0.0-linux64 NVIDIA-OptiX-7.0.0
Install Third Party Libraries
Download the following third party libraries for
Ubuntu 18.04from theBAPdevelopment website at Third party libraries downloads (Will need yourusernameandpasswordto access the site)x
boost 1.73.0glfw 3.3.2libpng 1.6.37itk 5.1.0pdp 2.6.4rnifti 1.1.0sqlite 3.32.1Move the downloaded files to
$HOME/Developer/Projectsdirectory and and extract with the7-ZipExtract Herecommand from the file browser.
Qt 5.15.0
Download the latest Qt unified windows installer from https://www.qt.io/download-qt-installer
Run the unified installer using open source user login. You will need to register as a QT Open Source user at the Qt website.
Select
$HOME/Developer/Projects/QTas the install directorySelect
Qt 5.15.0packagesDesktop gcc 64-bitandQtChartsand run installCreate symbolic link for install directory
$ cd ~/Developer/Projects$ ln -s ~/Developer/Projects/QT/5.15.0/gcc_64 qt-5.15.0
Install Datasets
Download the following Datasets for the
BAPdevelopment website at Data sets (Will need yourusernameandpasswordto access the site)BRATS PBT voxel classificationMNIST hand written numbersMove the downloaded files to
$HOME/data/ImageDatadirectory and and extract with the7-ZipExtract Herecommand from the file browser.
Install Neural Network models
Download the following models for the
BAPdevelopment website at Models (Will need yourusernameandpasswordto access the site)BRATS PBT voxel classificationMNIST hand written numbersMove the downloaded files to
$HOME/networksdirectory and and extract with the7-ZipExtract Herecommand from the file browser.
CLion build
Checkout the source
Use either the SmartSVN or TortoiseSVN svn clients to checkout the BAP source code from svn://3.14.90.147/bap/trunk to `$HOME/Projects/bap (Will need your username and password to access this repository).
Create the CLion project
- Create directory
`$HOME/Projects/bap-clion - ...